7-Day Linux Challenge: Day 1
Linux has been becoming increasingly more popular for the average user. However, I’ve been happy with my Windows 10 Pro, except for some issues that I’ve had in the past, such as my keyboard driver randomly breaking when I restarted (the fix, by the way, was changing some “UpperFilters” key in some place of the registry) and my network driver breaking. Overall, though, I had fixed these issues, even if it took a few hours of my time and some fixing.
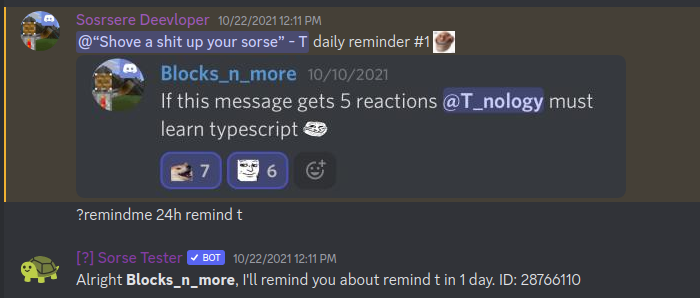
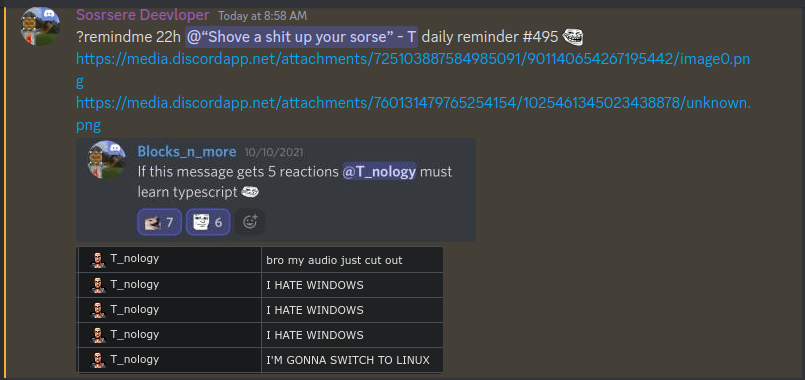
Anyways, though, why would I switch to Linux? A few reasons. The first reason is peer pressure. My friend, Blocks_n_more, has been pinging me on Discord for almost five hundred days to learn the TypeScript programming language:
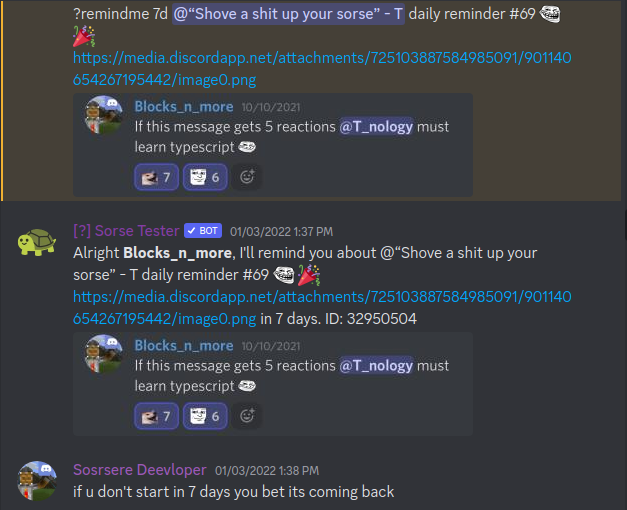
At 69 days, he took a one-week break:
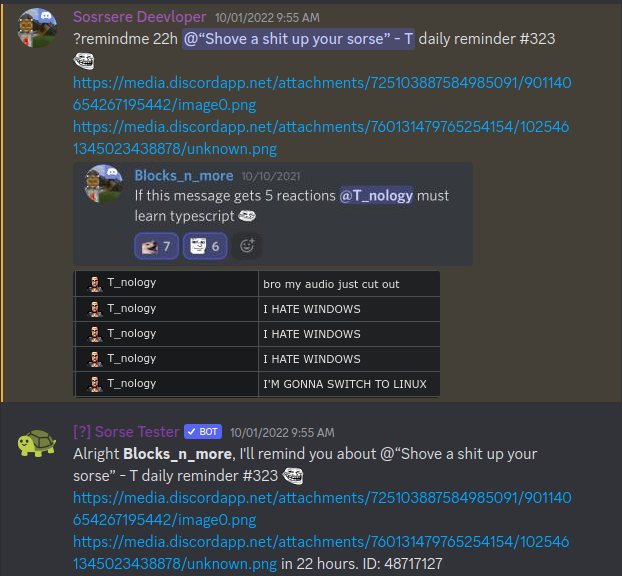
On day #323, he started pinging me to learn Linux based on TF2 Chat Logs he had found of me:
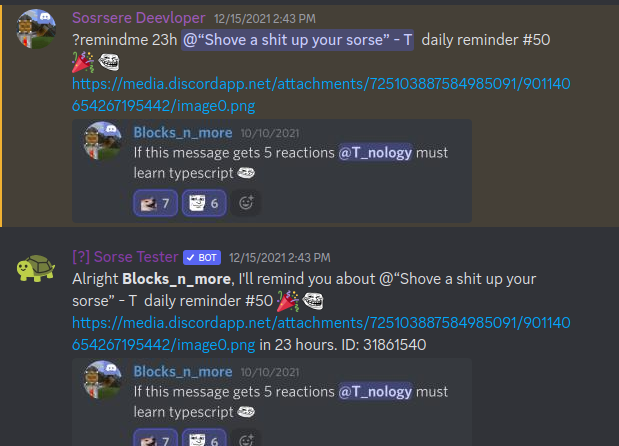
This leads up to today, where it is almost day 500:
I asked Blocks_n_more, “What if I switch to Linux on day 500?” He responded with, “That would be chad,” “install endeavouros,” “it’s arch but without the installing process of arch”
Peer pressure is not the only reason why I wanted to try linux out, though. Think about it – you can customize it way more than Windows without needing to do hacky stuff, and it’s free. I had mentioned a few times recently that while I believe that Linux will be the future of gaming and computers used for other tasks, I don’t believe that it’s ready quite yet. I am doing this challenge to see if I can be proven wrong.
One thing that I have been afraid of regarding Linux is not enough compatibility, which is why I have believed that it’s not ready yet. For example, ShareX, Microsoft PowerToys, and Microsoft Office serve as great software that is not available on Linux. Even if alternatives exist, they’re just alternatives.
This article will be covering my journey of trying out Linux. Do keep in mind that I am dual booted for Windows, and will still be using Windows for school. Why? Because I need Microsoft Office, and there are other reasons which I will not get into at the moment. Also keep in mind that I will not be making blog posts that are this long every day of the challenge, and I might only do blog posts for a few of the days. With that out of the way, let’s get into my Linux adventure.
Getting Ready to Install endeavourOS
To install endeavourOS, I went ahead and downloaded the ISO file, and put it on my Ventoy USB. In case you’re not aware, Ventoy is a useful multiboot software for USB flash drives, so you can have one flash drive to boot into different things. I’ve already had Secure Boot turned off, so I was good to go from there… At least I thought.
I forgot to make the partition that I would use for the installation, but it’s not like that mattered anyways, because I was greeted with an error and a command-line. I asked my friend Blocks_n_more for help, as he happened to be in call and I couldn’t be bothered to look it up myself. He said that the problem was that it was trying to make a file, and something went wrong because I was using Ventoy,
No worries, I thought – I’d take my other SanDisk USB 3 64GB Flash Drive and shrink the FAT32 partition on it through the Windows Disk Management tool, so that I could flash the ISO from Rufus onto that partition. I also went out of my way to shrink the partition of my X:\ drive, which is my Samsung 980 SSD, so that 100GB of free space would be available. This took a long time, and in Task Manager, the System process’s disk usage fluctuated between almost nothing and using 150+ MB/s. Meanwhile, when hovering my mouse over the Disk Management window, a blue spinning/loading circle appeared, and I couldn’t right click the disks. After closing and re-opening the Disk Management window, it was stuck on connecting to the virtual disk service, until it had finally completed.
Next, I went to resize the partition of my flash drive… Except I couldn’t. It wouldn’t let me. However, I happened to have AOMEI Partition Manager installed, which is a program I had used once when I had a really broken flash drive with a broken “RAW” partition. I had used that to shrink the partition, and got Rufus ready to flash the ISO… Except the partition that showed up showed as something along the lines of “Multiple Partitions (F:) (G:)”
Man! Of course, even if I try to flash it onto a different partition of the drive, it will format the whole drive. I didn’t want to waste a nice 64GB flash drive on a Linux installation, so I took this 16GB key-shaped USB 2 flash drive, backed up the small amount of data I had from that onto my PC, and used that for the endeavourOS ISO.
Afterwards, I went ahead and booted from the USB flash drive. I got into the endeavourOS installer after connecting to my WiFi network, but here comes another problem… Only my SATA HDD appeared during installation. I quickly realized what the problem was – the SATA mode setting in my UEFI was set to Intel Premium Optane instead of AHCI. I remember having this issue when I tried to install Linux Mint, and I remembered that I had to convert my Windows 10 installation to AHCI by using bcdedit to enable safe mode, changing the SATA mode to AHCI, booting into Windows with safe mode, and rebooting to install the drivers. I had changed it back, though, because I never went through with installing Linux.
I looked up instructions online for how to do this to ensure that I was using the proper bcdedit commands. After all, I’m pretty sure bcdedit is a command that is not something you want to be messing with, and it can probably mess up your system.
I did the process, and it worked out. One thing to note is that, for my laptop model, which is the Acer Nitro 5 AN515-54 51M5, I had to press Ctrl + S while in the “Main” tab to make the SATA mode show up in my UEFI. Therefore, if SATA mode doesn’t show up for you by default, then you can try doing that, especially if you have an Acer computer.
Afterwards, I went back into my endeavourOS bootable flash drive and did the installation process. I chose to install the KDE Plasma Desktop Environment, as well as printer support (with it saying “(cup)”, whatever that means), HP printer support, and the Firefox browser, and whatever else was checked by default. I installed it to the ~100 GB of available space I made on my drive, and thing went mostly well. Keyword is mostly.

My boot priority order is broken now. All that happens is, going down from the Secure Boot option, I select nothing (with the “2.” still highlighted in blue), and then the “2.” gets selected, being highlighted in white. I’m not sure what has happened, but the Windows Boot Manager is the one that boots by default, so I have to spam F12 booting up my computer now to get into the grub bootloader (which is the bootloader I chose during the installation process).
Linux Setup
Regardless, I had went ahead and installed Brave using the command-line, and installed the Chrome extensions that I could remember off the top of my head:
- Adguard
- Bitwarden
- SuperCopy
- Don’t F**k With Paste
- SponsorBlock
- Return YouTube Dislike
- SVG Export
(Note: While making this list, I realized that I forgot to install Wappalyzer. I better go do that!)
I also went ahead and disabled the Brave Rewards feature from appearing in my top bar, and enabled Wide Address Bar. I also made sure to enable dark theme.
I had installed Discord and connected to the call I was on, which was a call with a few of my friends, on my PC. I had the audio coming out of my speakers, and I realized I had to connect my Sony WH-1000XM4 wireless headphones to my PC. I tried going to System Settings > Bluetooth, but it simply said that no devices were paired. When looking up the issue online, I found that the Bluetooth service had to be started with systemctl. I did that and connected my headphones, and I noticed that the audio of everyone in the call was terribly distorted and robotic. When looking this issue up online, I found that it had something to do with the sound profile. The fix was by going to System Settings > Audio and setting the sound profile to “High Fidelity Playback,” changing it from, “Headset Head Unit (HSP/HFP),” which was causing the issue.
Then, I went to System Settings > Appearance and started browsing for new Window Decorations and Plasma Styles, using the “Get New {Insert Thing Here}…” button at the bottom. During this time, the browsing for new things started to act weird, and apparently the KDE Store coincidentially went down. Stuff still somewhat worked, though, and I ended up opting for a Global Theme that I really love the appearance of, called “Utterly Sweet.”
When starting to write this blog post, I realized I needed a screenshotting tool. It’s unfortunate that ShareX doesn’t seem to work on Linux, unless it works with Wine, which I guess I could test later.
Right Now
Now, I have to simply try out and (hopefully) enjoy the Linux experience. I do wonder what I will do regarding Microsoft PowerToys and Microsoft OneNote, as I will not be replacing the latter and the former is quite a useful set of tools. I’m pretty sure that ProtonVPN and Termius work on Linux, so I should be good to go regarding those.
Again, for school, I won’t be using Linux. This may be unfortunate news for you to hear, but I want to make sure it’s clear that I won’t be using Linux 24/7.
One last thing is that my friends don’t even know that I’m doing this as a “7 day challenge.” They just know that I’m “trying Linux out.” I’m not setting any rules in stone, so if something goes terribly wrong, I can cancel the challenge, so it’s more like a “7 day Linux trial.”
That’s about all for now, though. Thanks for reading!
7-Day Linux Challenge: Day 2 – T_nology's Blog
[…] It would help to read Day 1’s blog post before reading onto Day 2. It also gives my experience with installing it on my Acer Nitro 5 gaming […]
7-Day Linux Challenge: Day 6 – T_nology's Blog
[…] you’re new to reading this, I highly recommend you read my posts from Day 1 and Day 2, or at least from the […]